Today i'll introduce an ultimate easy method to Re-partition Nokia X/XL Without PC and just by flashing Zip Which do all Re-partition Commands.
How To increase Nokia X/XL System to 1gb And Data to 2gb Without PC !
all technical details about partitions, commands, tools & partition table was explained here
#include
/*
* Your warranty is now void.
*
* I am not responsible for bricked devices, dead SD cards,
* thermonuclear war, or you getting fired because the alarm app failed. Please
* do some research if you have any concerns about features included in this ROM
* before flashing it! YOU are choosing to make these modifications, and if
* you point the finger at me for messing up your device, I will laugh at you.
*/
Disclaimer:
by doing this, of course your warranty is now void, This method is VERY ADVANCED, I don't recommend newbies & beginners to do it, You may BRICK your device !
FIRST read to the end then do it !! I am not responsible for the "BRICKs".
A- Preparing:
1- Make sure to copy all files from your internal storage because it'll be formatted.
2- You must have sdcard in your mobile with at least 4.2gb free.
3- You should know this method will increase system to 1gb and data to 2gb, and will decrease internal to 150mb and preload.
4- This Process will wipe system - data - and internal storage.
B- Flashing:
1- Make sure you have TWRP 3.0.3 Download Here
2- Boot to Recovery, open settings and disable screen timeout
An Easy & Automatic Tool To Re-Partition Nokia X/XL
Developed by UltraDevs Team
#include
/*
* Your warranty is now void.
*
* I am not responsible for bricked devices, dead SD cards,
* thermonuclear war, or you getting fired because the alarm app failed. Please
* do some research if you have any concerns about features included in this ROM
* before flashing it! YOU are choosing to make these modifications, and if
* you point the finger at me for messing up your device, I will laugh at you.
*/
3- It'll make backup mmcblk0.img on your SDCard (needs 3.9 GB Free) And Done !
About UltraPart Tool:
it's simple dos tool to change Nokia X/XL Partition table, based on my previous guide here
All you need to do: Download tool, extract, run and choose option and done !
UltraPart Tool Features:
- Re-Partition Nokia X/XL To System 950MB And Data 2GB
- Restore Nokia X/XL Original Partition Table
- Install Nokia X/XL Drivers For Windows 32bit & 64bit
- Install / Reboot TWRP 2.8.7 Recovery
- Backup important partitions to PC (From p24 : p26)
- Check Partition Table After Re-partitioning
- Format New partitions After Re-Partition
- And More !
Preparing:
1- Make sure to copy all files from your internal storage because it'll be formatted.
2- You must have sdcard in your mobile with at least 250mb free (to backup partitions) Or 4.2gb (if you will take full dd backup).
3- You should know this method will increase system to 1gb and data to 2gb, and will decrease internal to 150mb and preload.
4- This Process will wipe system - data - and internal storage.
How to use UltraPart Tool:
First make sure drivers are installed and working, if not press d to install it.
As i told you, connect your mobile in twrp 2.8.7 recovery, if not installed press i to install it then:
- Press b to Backup your important partitions to PC (recommended)
- Choose what do you want to do then type number and enter.
- Check Successful of process by pressing c and compare p18 / p21 / p22 with this sheet
- Format New partitions: press f
- And Finally Install New ROM.
Downloads:
UltraPart Tool is open source and hosted on github.
So downloads can found on repository releases to download latest version always
بواسطة هذا التطبيق سوف تتابع آخر اخبار مشروعات الفريق والرومات المعدلة والريكفرى ومتعلقات التطوير الأخري.
كعادتنا التطبيق مجانى، يتميز بالواجهة الرائعة بنكهة ال ماتيريال ديزاين، ويدعم أغلب من اللغات، كما يحتوي على أكثر من ثيم لتغيير شكل التطبيق، ويمكنك من خلال تطبيقنا: - عرض المواضيع والمقالات حسب القسم - المطور - والهاتف المدعوم. - حفظ مقالاتك المفضلة للوصول إليها فى أى وقت. - 4 طرق لإستعراض المواضيع. - متابعة صفحاتنا الاجتماعية. أيضا تم إعداد التطبيق بحيث أنه لا يقوم بتحميل الصور فى حالة الاتصال من بيانات الهاتف (الباقة) لتوفير البيانات للمستخدمين، بينما يقوم التطبيق بتوفير اخر الموضوعات الموجودة على المدونة بمجرد اتصالك بالانترنت.
التطبيق حاليا فى نسخته الأولى، فإذا كان هناك أى أسئلة أو استفسارت أو مشاكل أو اقتراحات يرجي كتابتها فى تعليق أسفل هذه الصفحة، وترقبوا تحديثات دورية لإضافة المزيد من المميزات للتطبيق.
[ROM][NOKIA X/XL][PORT][UNOFFICIAL] Caramel OS v1.7 KK ROM 10-10-2016
What is Caramel OS?
This new firmware is based on CyanogenMod, With Some MODS And Good RAM Managment, Originally Made for Lenovo A706 by illya-lol
Some Features:
CyanogenMod base Complete AOSP 4.4 Kitkat Experience -Added indicator internet speed statusbare -Added points "screen density", "memory Panel" in the setup -In settings added new display memory usage -Added "Operations in the annexes" -Also a lot of things changed
Everything Working Perfectly, Tested on Nokia XL And Nokia X
Do Wipe then Flash the ROM - Reboot, after First boot Reboot to recovery again then Flash Fix.
For Nokia X:
Do Wipe then Flash the ROM and X Patch - Reboot, after First boot Reboot to recovery again then Flash Fix.
- If you need GApps Flash it After installing ROM.
After Installing The ROM:
1- Open Settings - Sim Cards - Configure Sim Cards then Active your sims.
2- Open Settings - Storage - Press Menu and choose USB connection then check MTP.
3-Open Settings - About Phone - Press 8 times on build number - go back and open Device Control - CPU Settings - change Governor to on demand - Change Minimum to 245 - Check Set on boot.
4- For using only 3G mode: Open the" dialer ", dial * # * # 4636 # * # * then change it.
5- Before starting video recording, change the quality to 480p.
للتثبيت على نوكيا اكس ال: قم بتفليش ملف الروم فقط ثم بعد أن يفتح قم بالدخول إلى الريكفرى مرة أخري وثبت التصليح. للتثبيت على نوكيا اكس: قم بتفليش ملف الروم والباتش ثم بعد أن يفتح قم بالدخول إلى الريكفرى مرة أخري وثبت التصليح.
Hello Nokia X&XL Users, Today we've an amazing guide about:
Ultimate Guide to Re-partition Nokia X/XL
(Increase System & Data size)
#include
/*
* Your warranty is now void.
*
* I am not responsible for bricked devices, dead SD cards,
* thermonuclear war, or you getting fired because the alarm app failed. Please
* do some research if you have any concerns about features included in this ROM
* before flashing it! YOU are choosing to make these modifications, and if
* you point the finger at me for messing up your device, I will laugh at you.
*/
Disclaimer:
by doing this, of course your warranty is now void, This method is VERY ADVANCED, I don't recommend newbies & beginners to do it, You may BRICK your device !
FIRST read to the end then do it !! I am not responsible for the "BRICKs".
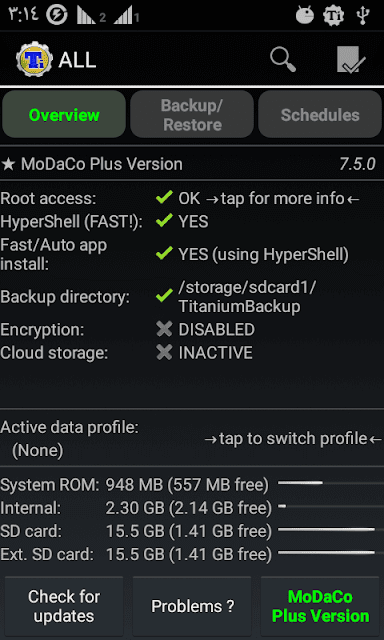
Nokia X/XL have 3.9 GB EMMC Storage (26 Partition), System is 560 MB , Data is 1.1 GB and Internal Storage is 1.2 GB.
Nokia X/XL Partitions & Blocks:
Nokia X Partitions & Blocks:
Nokia XL Partitions & Blocks:
by looking to this table, we don't know about These Partitions (p1-p2-p4-p5-p6-p7-p8-p9-p10-p11-p12-p13-p15-p20-p24-p26) Mounts, So before doing anything YOU HAVE TO BACKUP Them
The Main idea of Re-partitioning:
Increasing some partitions size by decreasing some others, WITHOUT dealing with any partition we don't know.
So you can control size of: System - Cache -Data - Storage - Preload
Open my Partitions Table Here and look:
I have two MODs:
1- 2.30 GB Data With 150MB.
2- 950 MB System + 2.30 GB Data With 150MB.
In these MODs i didn't chanced any partition size except ones i have marked.
How to Calculate Size of Any partition?
End - Start = Total (Number of blocks)
Total * 8 = Blocks (Size in Blocks)
Blocks / 1024 = Size in MB
Editing Partitions Sizes:
In order to edit any partition size you need to delete all partitions before it.
Ex. To edit Storage (p21) i have to delete partitions from p26 to p21.
Then you'll create them again with modified sizes.
The next step is set each partition ID like table (YOU CAN'T CHANGE ANY ID)
Final step is Syncing Partitions table & Apply changes.
Lets GO !
You'll need to:
- Many spare times to read and follow this tutorial.
- Your phone with battery not below 50%.
We'll Re-partition (p21 & p22) with sizes in above picture, to make Data 2.30 GB & Internal Storage 150 MB - Check Page 2 in Partition Table.
A-Preparing:
1- Copy whole data from Internal Storage to SD Card or PC
2- Boot to Custom Recovery then Unmount all partitions except SD Card.
3- Connect phone to PC via USB cable then open ADB tools (Shift + Right Click in ADB Folder - select Open CMD.
4- Type "adb shell" you'll see # sign, Now type "fdisk -l /dev/block/mmcblk0" 5- You'll see your partitions table, make sure it's like "First Page in Partition Table"
B-Backing Up UnknownPartitions :
1- Backup Partitions from 23 to 26, type:
2- Make sure this backup stored in SD Card not Internal Storage.
C-Re-Partitioning-Deleting Partitions:
1- Continue in ADB, type:
busybox
fdisk /dev/block/mmcblk0
2- We'll use "d" command to delete partitions from 26 to 21
Type each line command below then hit enter after every command
d
26
d
25
d
24
d
23
d
22
d
21
D-Re-Partitioning-Creating New Partitions:
1- Now we'll use "n" command to create new partitions with modified sizes, command usage:
n - Enter: To start creating new partition.
Start block - Enter: First cylinder of partition.
End block- Enter: Last cylinder of partition.
2- Continue in ADB After last command, type:
n
101413
120613
n
120613
406437
n
406437
418597
n
418597
419877
n
419877
469797
n
469797
477184
E-Re-Partitioning-Set New Partitions Type:
1- Now we'll use "t" command to set new partitions type as (Original Partition Table) with modified sizes, command usage:
t - Enter: Start Partition Type Modification.
Partition Number - Enter: Choose Partition.
Type ID - Enter: Set Partition ID.
2- Continue in ADB After last command, type:
t
21
c
t
22
83
t
23
83
t
24
7d
t
25
83
t
26
83
F-Re-Partitioning-Apply Modifications And Saving:
Till now we haven't done any real changes, you can cancel these changes by Closing ADB Window.
To Apply Changes:
1- use "p" command to sync new partitions to table, type: "p" then press Enter.
2- You'll see Modified Partition Table, Make sure all changes is OK.
3- Type "w" to save New Partition Table, then Wait till changes.
G-Restoring UnknownPartitions Backup:
We are finished Re-Partitioning, it's time to restore backup we made in step "b".
In order to use New Partitions we need to wipe it through Custom Recovery.
Boot to Custom Recovery and Wipe all partitions except SD Card.
Congratulations ! you have done it successfully, Now Flash any ROM / Restore Custom Recovery Backup to use your phone.
MOD 2: Increase System To 950 MB & Data Size to 2.30 GB
Nokia X:
Nokia XL:
We'll Re-partition all partitions from p18 to p26) with sizes in above picture, to make System 950 MB - Data 2.30 GB - Internal Storage 150 MB & Preload 30 MB - Check Page 3 in Partition Table.
A-Preparing:
1- Copy whole data from Internal Storage to SD Card or PC
2- Boot to Custom Recovery then Unmount all partitions except SD Card.
3- Connect phone to PC via USB cable then open ADB tools (Shift + Right Click in ADB Folder - select Open CMD.
4- Type "adb shell" you'll see # sign, Now type "fdisk -l /dev/block/mmcblk0" 5- You'll see your partitions table, make sure it's like "First Page in Partition Table"
B-Backing Up UnknownPartitions :
1- Backup Partitions 20 & from 23 to 26, type:
2- Make sure this backup stored in SD Card not Internal Storage.
C-Re-Partitioning-Deleting Partitions:
1- Continue in ADB, type:
busybox fdisk /dev/block/mmcblk0
2- We'll use "d" command to delete partitions from 26 to 21
Type each line command below then hit enter after every command
d
26
d
25
d
24
d
23
d
22
d
21
d
20
d
19
d
18
D-Re-Partitioning-Creating New Partitions:
1- Now we'll use "n" command to create new partitions with modified sizes, command usage:
n - Enter: To start creating new partition.
Start block - Enter: First cylinder of partition.
End block- Enter: Last cylinder of partition.
2- Continue in ADB After last command, type:
n
16931
134688
n
134690
147487
n
147489
147491
n
147493
166690
n
166692
452514
n
452516
464674
n
464676
465954
n
465956
469794
n
469796
477184
E-Re-Partitioning-Set New Partitions Type:
1- Now we'll use "t" command to set new partitions type as (Original Partition Table) with modified sizes, command usage:
t - Enter: Start Partition Type Modification.
Partition Number - Enter: Choose Partition.
Type ID - Enter: Set Partition ID.
2- Continue in ADB After last command, type:
t
18
83
t
19
83
t
20
4c
t
21
c
t
22
83
t
23
83
t
24
7d
t
25
83
t
26
83
F-Re-Partitioning-Apply Modifications And Saving:
Till now we haven't done any real changes, you can cancel these changes by Closing ADB Window.
To Apply Changes:
1- use "p" command to sync new partitions to table, type: "p" then press Enter.
2- You'll see Modified Partition Table, Make sure all changes is OK.
3- Type "w" to save New Partition Table, then Wait till changes.
G-Restoring UnknownPartitions Backup:
We are finished Re-Partitioning, it's time to restore backup we made in step "b".
In order to use New Partitions we need to wipe it through Custom Recovery.
Boot to Custom Recovery and Wipe all partitions except SD Card.
Congratulations ! you have done it successfully, Now Flash any ROM / Restore Custom Recovery Backup to use your phone.
Notes:
1- If you get "Warning" Error in Step F-3, Check Partitions using "p" command, if changes can't be done then Change Custom Recovery then do Steps again.
2- If Custom Recovery rebooted suddenly, don't worry do Steps again.
3- If TWRP couldn't wipe New Partitions, boot to ClockWorkMod Recovery 6.0.4.8 and Wipe them.
4- Nokia X doesn't have p26 partition.
Final Result:
Thanks: netware @4pda For helping me doing this on Nokia XL


 then Unmount all partitions except SD Card.


 Note: To Restore Original Partition Table:


